
깊은 복사 vs 얕은 복사
Java에서 객체를 복사할 때, 깊은 복사와 얕은 복사라는 개념이 있다.
간단하게 정리하자면
깊은 복사 : 실제 값을 새로운 메모리 공간에 복사하는 것이고,
얕은 복사 : 주소 값을 복사하는 것이다.
간단 예제
아래 예제를 통해 일단 간단히 알아보자.
int[] original = new int[]{1,2,3};
int[] shallowCopy = original; //얕은 복사
int[] deepCopy = original.clone(); //깊은 복사
//주소 값 확인
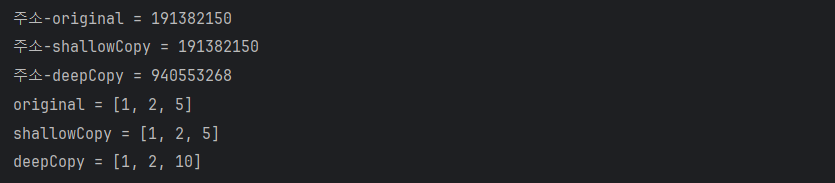
System.out.println("주소-original = " + System.identityHashCode(original)); //주소-original = 191382150
System.out.println("주소-shallowCopy = " + System.identityHashCode(shallowCopy)); //주소-shallowCopy = 191382150
System.out.println("주소-deepCopy = " + System.identityHashCode(deepCopy)); //주소-deepCopy = 940553268
//값 변경
shallowCopy[2] = 5; //얕은 복사한 배열 데이터 변경
deepCopy[2] = 10; //깊은 복사한 데이터 변경
System.out.println("original = " + Arrays.toString(original)); //original = [1, 2, 5]
System.out.println("shallowCopy = " + Arrays.toString(shallowCopy)); //shallowCopy = [1, 2, 5]
System.out.println("deepCopy = " + Arrays.toString(deepCopy)); //deepCopy = [1, 2, 10]출력
System.identityHashCode()
우선 각 객체의 주소를 확인해 보자.
shallowCopy는 original과 주소가 일치하는 것을 확인할 수 있고, deepCopy는 주소가 다르다.
값 변경
shallowCopy와 deepCopy의 값을 수정했다.
shallowCopy의 경우, original의 주소를 참조하고 있기 때문에 Heap 메모리 상에서 같은 객체를 가리킨다.
따라서 shallowCopy에서 데이터를 변경하면 original의 데이터를 변경하는 것과 마찬가지이다.
deepCopy의 경우 새로운 메모리 공간에 복사를 했기 때문에 original과는 관련이 없다.
(만약 이 이론이 틀렸다면, original의 출력 값이 [1, 2, 10]이 되어야 맞다.)
얕은 복사(shallow copy)
얕은 복사는 기존 객체의 주소를 그대로 참조하는 객체를 새로 만드는 것이다.
따라서 복사한 객체의 값을 변경하면, 기존 객체의 값도 변경된다.
Student student = new Student("Kim", 111);
Student shallowCopy = student;
위에서 얕은 복사를 통해 shallowCopy에 student를 복사하면 위의 그림과 같이 같은 인스턴스를 참조하게 된다.
Stack영역에 shallowCopy라는 객체를 생성했지만, Heap영역에 있는 같은 인스턴스를 참조한다.
shallowCopy.number = 222;
System.out.println("original : " + student.number); //original : 222
System.out.println("shallowCopy : " + shallowCopy.number); //shallowCopy : 222따라서 이렇게 둘 중 하나의 객체의 값을 변경하면, Heap 영역에 존재하는 인스턴스의 값이 변경되어 student와 shallowCopy의 number 데이터를 확인하면 둘 다 변경된 것을 확인할 수 있다.
깊은 복사(deep copy)
깊은 복사는 실제 값을 복사하여 메모리 공간에 새로운 인스턴스를 만드는 것을 말한다.
깊은 복사를 구현하는 방법은 여러 가지가 있다.
- Cloneable 구현 - Object.clone()
- 복사 생성자
- 복사 팩터리 메서드
- 등등..
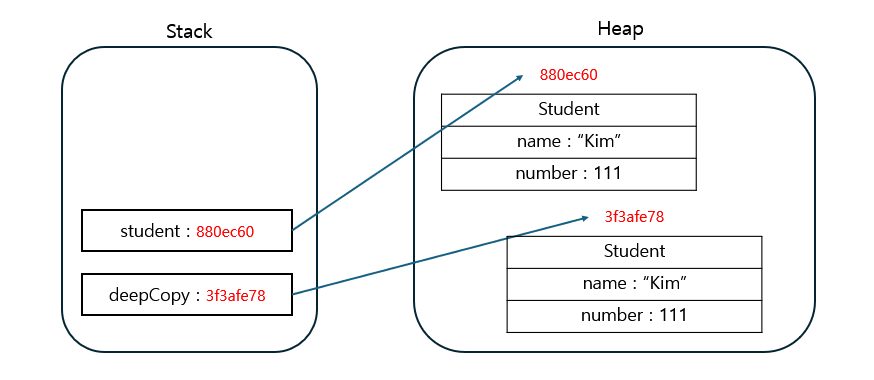
깊은 복사 시에는 위의 그림처럼 새로운 Student 인스턴스를 생성하여 Heap 메모리에 적재하게 된다.
Cloneable 구현

Cloneable 인터페이스는 위와 같이 정의된 메서드가 없지만, 주석을 살펴보면 Object.clone() 메서드를 반드시 구현하라고 설명이 되어있다.
public class Student implements Cloneable{
    String name;
    int number;

    public Student(String name, int number) {
        this.name = name;
        this.number = number;
    }

    @Override
    protected Student clone() throws CloneNotSupportedException {
        return (Student)super.clone();
    }
}
이렇게 Cloneable을 implements 한 뒤, clone() 메서드를 구현한다.
Student student = new Student("Kim", 111);
Student deepCopy = student.clone();

deepCopy.number = 222;
System.out.println("student = " + student.number); //student = 111
System.out.println("deepCopy = " + deepCopy.number); //deepCopy = 222deepCopy.number 값을 변경하여도 기존 student.number에는 변화가 없는 것을 확인할 수 있다.
복사 생성자 / 복사 팩터리 메서드
아래와 같이 생성자 또는 팩터리 메서드를 이용할 수도 있다.
public class Student{
    String name;
    int number;
    public Student(){}

    //복사 생성자
    public Student(Student original){
        this.name = original.name;
        this.number = original.number;
    }
    //복사 팩터리 메서드
    public static Student copy(Student original){
        Student student = new Student();
        student.name = original.name;
        student.number = original.number;
        return student;
    }
}
'Java' 카테고리의 다른 글
| [Java] 소켓 프로그래밍(Socket Programming) 예제 / ServerSocket, Socket, Thread 프로그래밍 (0) | 2024.08.09 |
|---|---|
| [Java] 문자열 붙이기 - StringJoiner와 String.join() 알아보기 (1) | 2024.03.17 |
| [Java] equals()와 hashCode() / equals와 hashCode를 둘 다 재정의 해야하는 이유 (0) | 2024.03.14 |
| [Java / CS] JVM과 Java의 메모리 구조 (0) | 2024.02.16 |
| [JAVA] 문자열 다루기 String, StringBuilder, StringBuffer (0) | 2023.06.28 |